
Once you have running VM on your Azure, add the following features using Server Manager
- Add the ‘Web Server (IIS)’ role to the server.
- Add the IIS features you need.
- Add a TCP endpoint to your VM in the management portal with public and private port 80.
To enable FTP, make sure you enable the ‘FTP Server’ role services for your IIS role:

Add and configure FTP site
The next step is to create the actual FTP site in IIS. Right-click on ‘Sites’ in IIS Manager and select ‘Add FTP Site…’:

Specify the name and the local path for the site:

Specify binding and SSL information:
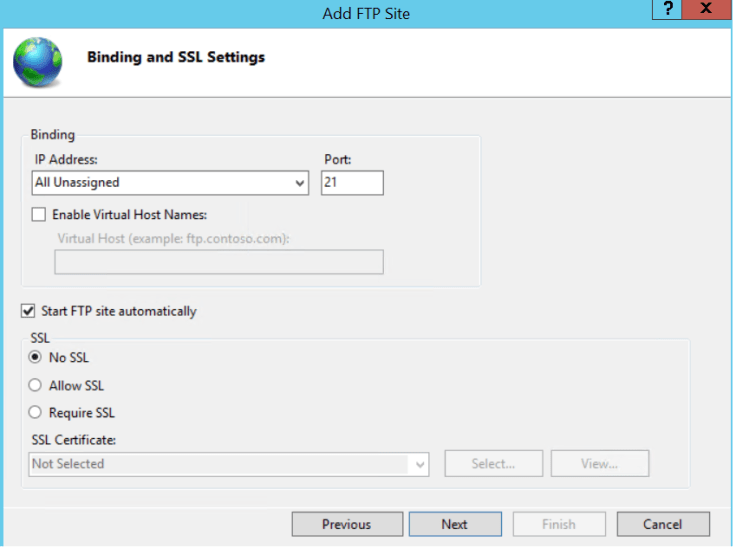
And finally, specify who should have access to the FTP site. Note that I selected Basic Authentication and the administrator user. This corresponds to the local administrator account on the VM (the same account you use when you use RDP to login). This is definitely not the best solution. When you do not use SSL to secure access to the FTP site, your FTP credentials are sent in cleartext when logging in to the FTP site.
Local testing
You should now be able to access the FTP site from within the VM. Open a command prompt, type ‘ftp 127.0.0.1’ and log in with your administrator account.
Configuring remote connectivity
First of all, for active FTP, in theory, you need to allow access to ports 21 (FTP command port) and 20 (FTP data port). So you need to add two endpoints to your VM.
So far the theory. When attempting to connect to the FTP site using Filezilla, explicitly indicating that we’d like to use active mode, still no connection can be established. I haven’t figured out why exactly…
But of course, we can still try to configure passive FTP. For this to work, we need to tell the IIS FTP server the port range it can use for data connections and we need to add endpoints to the VM that correspond to this port range.
First of all, configure the port range and external IP address for passive data connections. This can be found in IIS Manager:

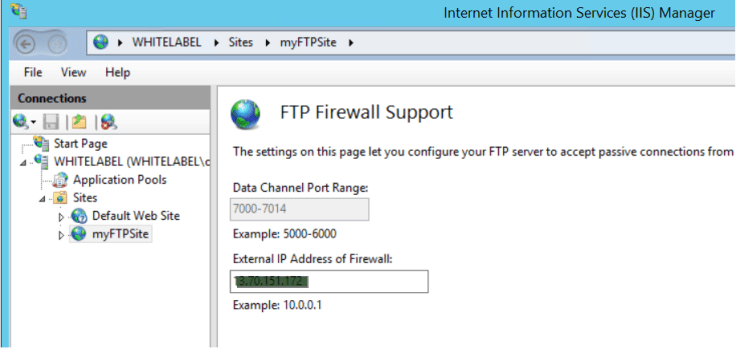
The external IP address should be the Virtual IP address you can find in the Azure Management portal. Unfortunately, it seems impossible to specify the data channel port range here. To set this, we need the appcmd utility, which can be found in %windir%\system32\inetsrv.
appcmd set config /section:system.ftpServer/firewallSupport
    /lowDataChannelPort:7000 /highDataChannelPort:7014
In the example, I chose ports 7000 to 7014 but you can choose any port range you like as long as it corresponds to the endpoints you configure for your Azure VM.
We’re almost there. Although the Windows firewall seems to allow all traffic that’s required, you also need to enable stateful FTP filtering on the firewall:
netsh advfirewall set global StatefulFtp enable
Finally, restart the FTP Windows service and we should be up and running:
net stop ftpsvc
net start ftpsvc
Testing with Filezilla confirms that we can now successfully connect to our new FTP site, hosted on a Windows Azure VM:
First, go to Edit Settings and select Active Mode and click ok.


Leave a comment